
Surveying is the initial step for any project, and there are types.
If an area is small and flat without any undulations, we can use chain surveying and tape measurement. In 
The survey involves evaluating land for making maps or plans for construction projects. It helps to narrate the project execution in the right way to avoid the fall of the work in another land.
We have discussed the principles of surveying and types of surveying according to the work to be commenced.
What is Compass Surveying?
A compass is a small instrument that is used to measure the angle of two points.
The angle of two lines would be derived by using a magnetic meridian reference line (magnetic bearing of a line). Surveying done by a magnetic bearing compass instrument using a traverse method of calculation is known as compass surveying. On-chain surveying, we follow triangulation methods.
Principles of Compass Surveying
The compass survey principles are traversed.
The survey points are connected as a series of lines. It is measured by the magnetic bearing of the compass instrument. The angle between the lines is measured, and the chain measures the length. It is known as the compass traversing.
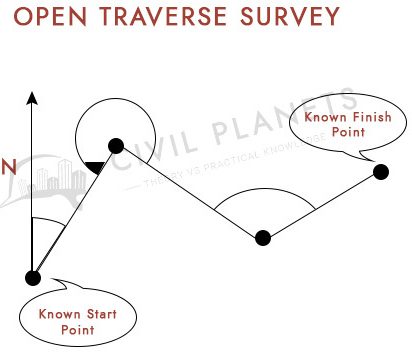
Compass Traversing computed in two ways such as open traverse and closed traverse.
Types of Compass in Surveying
The compass surveying is classified into two types as per the instruments used in this surveying.
- Prismatic Compass
- Surveyor Compass
Prismatic Compass
Prismatic Compass Parts
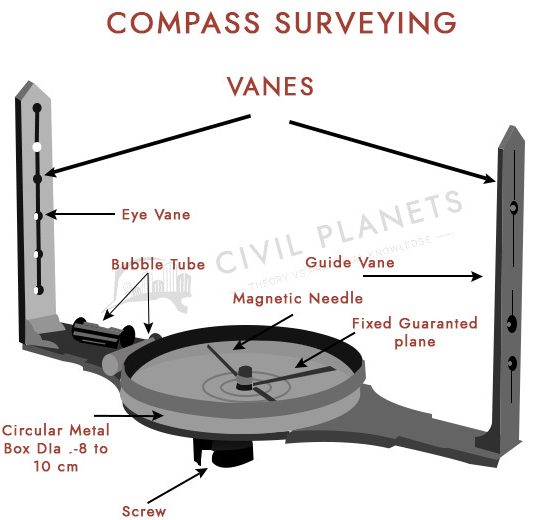
The prismatic compass consists of the following parts
- Eye Vane – Placed opposite to guide vane with an eye hole.
- Object Vane – Placed opposite to eye vane. It bears a thin black wire to sight.
- Circular Metal Body (Dia 8 – 12 cm) – The outer body layer of the instrument.
- Magnetic needle – the core of the instrument. Points towards North and South Pole
- Graduated Circle Ring – Used to measure the angle (0 – 360 degree)
- Glass Cover – It covers the instrument from dust and water
- Pivot – placed at the center and supports the magnetic needle to move freely
- Lifting Pin – Placed below the guide vane.
- Reflecting Mirror – Used to adjust the level of an object above or below the instrument level.
- SunGlasses – Used when some bright objects intersect the view.
Prismatic Compass Adjustments
After placing the instrument, the following adjustments need to be made for measuring
- Centering – The compass should be kept precisely over the station where the bearing is to be measured. If it’s not, using the tripods, it should be held centrally over the peg.
- Leveling – Using the bubble tube, the instrument should be adjusted to level.
- Focusing – The prism should be moved up and down so that the aluminum ring is seen as clear, sharp, and focused.
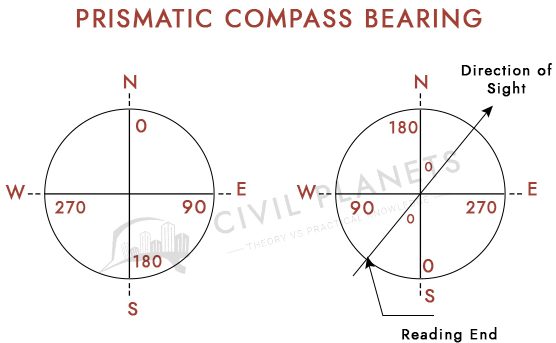
Prismatic Compass Bearing
Surveyor Compass
Surveyor Compass Parts
- Eye Vane – Placed opposite to guide vane with an eye hole.
- Guide Vane – Placed opposite to eye vane.
- Bubble Tube – Used to place the instrument at a level.
- Magnetic needle – the core of the instrument. Points towards North and South Pole
- Graduated Circle Ring – Used to measure the angle (0 – 360 degree)
- Fixed Graduated Plane
- Adjustment Screw
- Glass Cover – It covers the instrument from dust and water
- Circular Metal (Dia 8 – 10 cm) – The outer body layer of the instrument.
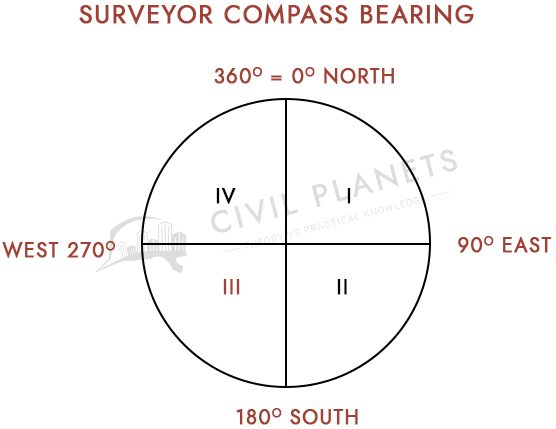
Surveyor Compass Bearing
Difference between the Prismatic Compass and Surveyor Compass
| SI | Prismatic Compass | Surveyor Compass |
| 1 | The magnetic needle & the graduated attached when the prism & box in rotation. | The magnetic needle would be free when the dial is attached to the box. |
| 2 | The graduations are provided in the clockwise direction. 0 to 360 degree | The graduations are divided into 4 quadrants. Each quadrant marked by 0 to 90-degree graduations. |
| 3 | The readings are taken through the eye-piece of the prism by the south end of the compass. | Reading can be taken directly through the dial where the north end of the needle. |
| 4 | The initial reading starts from the south end of the instrument. | The initial reading starts from the north end of the instrument. |
| 5 | The position of East & West constant. | The position of east & west interchanged. |
| 6 | The tripod is not required, the survey can be done by the instrument held in hand also. | The tripod required placing the instrument. |
| 7 | We can get the whole circle bearing. | We can get only reduced bearing. |
Errors in Compass Surveying
Errors are common in any type of surveying. It can be classified as
- Instrumental Errors – Errors occurred due to the wrong adjustment or by the instrument fault.
- Personal Errors – Errors occurred by compass adjustments such as leveling, centering, and fixing.
- Nature Errors – Errors occurred by local influencing factors such as magnetic field, local attractions, and declination.
Advantage & Disadvantage of Compass Surveying
Advantages
- The instrument is easy to operate & handle.
- No electrical power required.
- It is Suitable for retracing the old survey.
- Less human resources required.
Disadvantages
- The accuracy of the reading is less precise.
- The instrument error happens often.
- An error may happen due to the imperfection of the ranging rods or eyesight.
Happy Learning 🙂